 Save
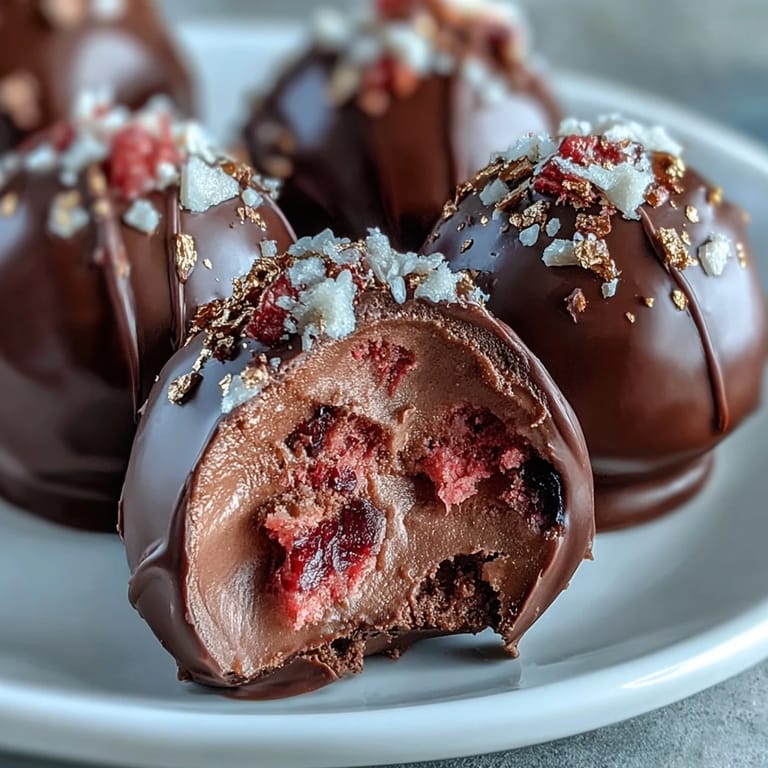
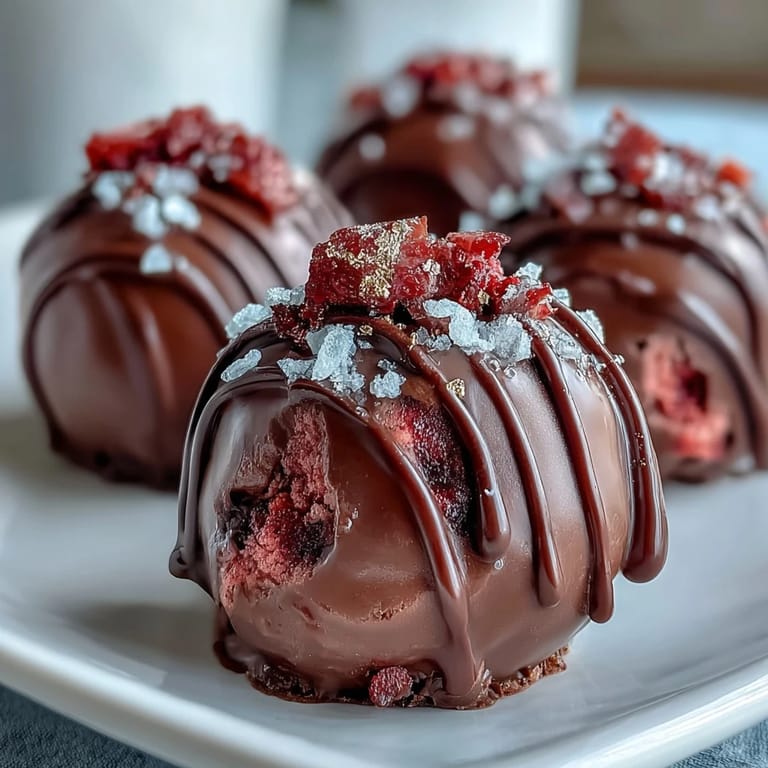
Save I stumbled upon these truffles at a luxury market in Dubai, watching a chocolatier dust each one with gold flakes like she was painting tiny edible masterpieces. The strawberry center caught my eye first—that deep pink against the dark chocolate seemed almost too beautiful to eat. When I finally tasted one, the tartness of freeze-dried strawberries paired with smooth ganache felt like a small luxury I could actually recreate at home. That evening, I came back to my kitchen determined to unlock the technique, and after a few attempts, I realized the magic was in patience and precision.
Last winter, I made these for my sister's engagement party, and watching her guests pick them up with genuine awe—pausing to admire the gold before tasting—reminded me that food is sometimes about creating a moment, not just flavors. Someone asked how long they took, and when I said less than three hours including chilling time, they looked shocked. That's when I knew this recipe was special enough to share.
Ingredients
- 200 g high-quality dark chocolate (70% cocoa), chopped: This is your foundation—don't skimp here because the quality shines through in every bite, and good chocolate melts smoother with fewer lumps.
- 100 ml heavy cream: Room-temperature cream whisks in easier, but cold cream works too if you warm it gently first before mixing with chocolate.
- 30 g unsalted butter: This adds silkiness that makes the ganache melt on your tongue instead of feeling dense.
- 1/3 cup freeze-dried strawberries, finely crushed: The freeze-dried version gives you concentrated strawberry flavor without moisture that would ruin your ganache texture.
- 1 tsp pure vanilla extract: A small amount deepens the chocolate flavor without making it taste like vanilla cake.
- Pinch of sea salt: This tiny pinch makes the strawberry and chocolate sing together in ways you wouldn't expect.
- 200 g dark chocolate for coating: Same quality as your center chocolate keeps everything harmonious throughout.
- 2 tbsp freeze-dried strawberries for rolling: Optional but worth it—these give a fruity exterior that hints at what's inside.
- Edible gold flakes for garnish: The visual magic that makes these feel luxurious; check they're food-safe before using.
Tired of Takeout? 🥡
Get 10 meals you can make faster than delivery arrives. Seriously.
One email. No spam. Unsubscribe anytime.
Instructions
- Set up your chocolate base:
- Place your chopped dark chocolate in a heatproof bowl and set it nearby where you can reach it easily. This is the moment to make sure your bowl is completely dry, because even a drop of water can seize your chocolate.
- Heat the cream and butter:
- Warm them together in a saucepan over medium heat until you see small bubbles forming around the edges—that's your signal to stop, because once it boils, the texture changes. You're not making hot chocolate; you're gently warming these ingredients to carry heat to the chocolate.
- Create the ganache:
- Pour that warm cream mixture over your chocolate and resist the urge to stir immediately; let it sit for two minutes so the heat gently softens the chocolate. Then stir in slow, deliberate circles until everything is smooth and glossy, with no streaks of chocolate visible.
- Add your flavor:
- Fold in the crushed strawberries, vanilla, and sea salt, stirring gently until the mixture looks uniform. You'll notice the color shifts to a warm brown-pink, and the aroma becomes intoxicating.
- Chill until scoopable:
- Cover the bowl and refrigerate for 1 to 2 hours until the mixture is firm enough to hold a shape but still soft enough to scoop. This is the hardest part—the waiting—but don't skip it or your truffles will be shapeless blobs.
- Shape your truffles:
- Use a melon baller or small spoon to scoop portions into roughly 2.5 cm balls, placing each one on parchment paper as you go. If the mixture gets too warm and sticky, pop it back in the fridge for ten minutes.
- Quick freeze:
- Freeze the shaped truffles for 15 minutes to firm them up, which makes dipping much cleaner and prevents them from sliding off your dipping tool.
- Prepare your coating chocolate:
- Melt the remaining 200 g chocolate using a double boiler or microwave, stirring often and working in 20-second bursts if using a microwave to prevent overheating. Let it cool for just a moment so it's warm but not scalding when you dip.
- Dip with confidence:
- Using a fork or dipping tool, submerge each truffle briefly in the melted chocolate, then lift it out and let the excess drip off for a few seconds. This creates a thin, elegant coating rather than a thick shell.
- Add your fruity accent:
- While the chocolate is still wet, roll some truffles in the extra crushed strawberries if you want that fruity exterior, or skip this step for a plain chocolate look.
- Gold leaf moment:
- Immediately after dipping, touch a tiny pinch of edible gold flakes to the top of each truffle while the chocolate is still tacky enough to hold them. This is where they transform into something truly luxurious.
- Final set:
- Leave the truffles at room temperature or refrigerate for 15 minutes until the chocolate coating hardens and feels smooth to the touch. Now they're ready to impress.
 Save
Save There's something almost meditative about the dipping phase—the rhythm of lift, drip, place becomes almost hypnotic after the fifth or sixth truffle. When someone asked me once if I'd ever considered selling these, I realized they'd stopped being just a recipe and become something I made when I wanted to gift people a tiny moment of luxury.
The Art of Tempering Your Chocolate
You might notice your coating chocolate sometimes develops a white bloom or doesn't snap cleanly—that's chocolate that hasn't been tempered, and while it still tastes fine, the appearance suffers. If you want a truly professional-looking truffle with a shiny finish, you can temper your coating chocolate by melting it to 50°C, cooling it to 27°C, then gently reheating it to 31°C, but honestly, most people won't notice the difference and the extra steps aren't necessary for a homemade batch. The simpler method of just melting and using it warm works beautifully for gifts and personal enjoyment.
Customizing Your Flavor Profile
These truffles are a blank canvas once you master the basic technique, and that's where the fun really starts. The original recipe is lovely, but I've made versions with a splash of rose water for a Middle Eastern twist, or a tiny pinch of cardamom that makes them taste mysteriously spiced. One time I added a hint of raspberry extract instead of vanilla and suddenly had a whole different dessert on my hands.
Storage and Gift-Giving Tips
These truffles keep beautifully in the refrigerator for up to a week in an airtight container, and they actually taste even better on day two or three when the flavors have settled together. They pair wonderfully with Champagne, strong coffee, or even a small glass of dessert wine if you want to serve them properly. The gold flakes don't affect storage at all, so they stay visually stunning right until the moment someone bites into one.
- Pack them in small paper cups inside a box if gifting, as this protects the gold leaf and prevents them from sticking together.
- Remove them from the fridge about five minutes before serving so they soften slightly and melt on the tongue rather than taste waxy.
- Double-check your gold flakes are truly edible and food-safe before using them, as some decorative products are only for display.
 Save
Save Making these truffles taught me that luxury doesn't always require complexity—sometimes it's just about choosing good ingredients and taking time with the details. Every time I make them, I think about that chocolatier in Dubai and feel grateful for small moments that inspire something beautiful.